In a previous post I detailed the issues that arose when I upgraded my Ubuntu to 22.04 (a.k.a. Jellyfish), and gave a broad outline of how I went about fixing them. But there’s one nasty issue I left out: after the upgrade I found out that the OS would sometimes automatically log me out right after I log in. The behavior was very inconsistent. Sometimes I got logged out, sometimes I didn’t. I would have to try logging in a varying number of times, up to 6 or 7, before a log in would be accepted. The time interval between logging in and getting logged out ranged from immediately to 2 minutes. It was an annoying bug, but it was another couple of months before I decided to tackle it. Fixing the other upgrade problems took a couple of hours, but I had a feeling this one was different. I had software projects I wanted to work on, so I decided to postpone dealing with the problem.
When I finally started working on the issue, the first thing I discovered was that it doesn’t happen when I switch from Wayland to Xorg. Since Ubuntu 22.04 was Wayland’s debut as the default display server, I concluded that something broke in Wayland during the upgrade. With this conclusion in hand I turned to Google for help. A search informed me that it’s a problem which many Linux users have experienced before, but there was little in the way of solutions which relate to my specific case. A useful suggestion was trying to log in using a test user account, something which informed me that the problem was system-wide and, consequently, enabled me to rule out my user’s configuration files as the source of the problem. Another suggestion was checking my tmp directory’s permissions, but there was nothing anomalous there. Other than that the only relevant suggestion I found was the nuclear option: reinstalling the desktop environment and the gdm. The reinstallation process went smoothly, but when I tried to log in afterwards the OS logged me out again. At this point I concluded that the cause of the issue was unique to my case and that I, consequently, had to come up with a solution on my own.
I started, naturally enough, with examining the authentication log. But after poring over its records for a long time I finally came to the conclusion that there was nothing relating to the problem there. I examined the kernel log next, but the result was the same. The breakthrough came when I moved on to the syslog. When I examined the event records whose timestamps matched the time of the automatic log outs, I discovered that every time an automatic log out happens a couple of records similar to these would be present:
13 Jan 29 08:12:12 COMPUTER NAME systemd-oomd[644]: Killed /user.slice/user-1000.slice/user@1000.service/session.slice/org.gnome.Shell@wayland.service due to memory pressure for /user.slice/user-1000.slice/user@1000.service being 55.78% > 50.00% for > 20s with reclaim activity
13 Jan 29 08:12:12 COMPUTER NAME systemd[1899]: org.gnome.Shell@wayland.service: systemd-oomd killed 25 process(es) in this unit.
The cause of the problem was now clear: the “out of memory” daemon (oomd) kills a bunch of the Gnome Shell’s processes every time its swap activity exceeds 50%. The problem started after the upgrade because oomd was turned on by default in 22.04. I’m not sure why oomd didn’t cause the same problem when I tried switching to Xorg. My guess is that it’s either because the Gnome Shell’s swap activity under Xorg is always lower than 50%, or that oomd is somehow turned off when Xorg takes over as the system’s display server.
I wasn’t surprised when I found out the cause of the problem. Ever since it was made a default on Jellyfish, people have been complaining about oomd killing software processes without proper justification and without a warning. What’s different about my case is that oomd’s aggressive killing of software processes has resulted in an automatic logouts problem.
The solution was disabling oomd. Following the instructions outlined here, I executed the command:
systemctl disable --now systemd-oomd
then checked the status of the process using:
systemctl is-enabled systemd-oomd
The result was exactly what it was supposed to be:
disabled
I logged out and then logged in. To my surprise, I got automatically logged out again. The next log in attempt was successful. When I checked syslog I found the familiar records showing that oomd had, once again, killed a bunch of the Gnome Shell’s processes right before the automatic logout. I checked the status of oomd but the official verdict was that the process was still:
disabled
The oomd process was running even though its official status was “disabled”. It was time to go for a more dramatic solution, and the recommendation was using the command:
systemctl mask systemd-oomd
for which the result is:
Created symlink /etc/systemd/system/systemd-oomd.service → /dev/null.
I’m happy to say that this was the end of the automatic logout problem on my Ubuntu.
Linux has historically had a serious problem dealing with situations where the system is critically low on memory. The “Task Manager” was the brilliant solution which Microsoft’s developers came up with, in 1994, to handle situations like these. In contrast, Linux’s userspace attempt, taken a quarter of a century later, to tackle this problem turned out to be the cure that is as bad as the disease.
What about the “Year of Linux on the Desktop”? Maybe the next millennium.
Posted: 12-02-2023
Tags: linux
In the C programming language, recursive directory traversal is provided by POSIX’s ftw library. But there’s also a popular non-POSIX library that provides the same service, which is fts. It originated in BSD, and was later adopted by Linux (via glibc) and macOS.
The fts library traverses a directory recursively and returns a struct for each file it encounters. The returned struct contains comprehensive information about the file, including the following properties:
char *fts_path;		     /*	root path */
size_t fts_pathlen;	     /*	strlen(fts_path) */
char *fts_name;		     /*	file name */
size_t fts_namelen;	     /*	strlen(fts_name) */
It’s important to note that this is taken from the FreeBSD documentation. The fts_path property is described as the “root path”, but what it actually provides is the file’s full path. The long description contains the reason for this choice of words:
fts_path
              The path for the file relative to the root of the
              traversal.  This path contains the path specified to
              fts_open() as a prefix.
Generally, describing a path as root implies that it’s a directory. The BSD people chose to describe the full file path as “root” because of its relation to the path of the directory being traversed, which, in this context, is a root path.
As it happens, this BSD use of the word caused a mix-up to happen in the library’s GNU documentation:
char           *fts_path;     /* root path */
short           fts_pathlen;  /* strlen(fts_path) +
                                                strlen(fts_name) */
char           *fts_name;     /* filename */
short           fts_namelen;  /* strlen(fts_name) */
Because fts_path is described as the “root path”, the writer thought that it represents the directory containing the file, and that led him to redefine fts_pathlen as the sum of the lengths of the fts_path and fts_name properties. This happened even though the GNU documentation’s long description is copied verbatim from the FreeBSD documentation:
fts_path
              The path for the file relative to the root of the
              traversal.  This path contains the path specified to
              fts_open() as a prefix.
This mistake happened because of a combination of BSD’s unconventional use of a technical term and the GNU writer’s failure to read (or comprehend) the relevant description. Another interesting observation to be made here is that the library’s documentation was written by someone who hasn’t actually worked with the library.
Posted: 8-12-2022
Tags: c
For Sale (LIMITED TIME ONLY):
Beautiful error screen with minimalist design and ergonomic font
(Credits: Mutaz)
Posted: 22-09-2022
Tags: windows
Every two years the time comes to upgrade my Ubuntu. I know that I’ll get Ubuntu’s most stable updates for the packages on my system, and I also know that the upgrade will break some of my packages and I’ll have to spend a couple of hours fixing them.
This year the upgrade is from 20.04 (Focal Fossa) to 22.04 (Jammy Jellyfish). A few days ago all the stars aligned and I decided that “[i]t’s time, Butch”. I rely on the command line to do upgrades, but when I, whilst performing due diligence, checked out Ubuntu’s official website I discovered that there was no mention at all of the command line - the tutorial was exclusively on the GUI client. I find this odd, but my guess is that it may be part of a push by Canonical to present Ubuntu to the masses as a mainstream OS. (Linux in general had always, with good reason, been more attractive to the techie/developer crowd than to average users.) I decided to put on my “average user” hat and use the GUI client, but it turned out that this year wasn’t meant to be the “Year of Linux on the Desktop”.
I began by backing up my data and launching the GUI client. Then I clicked through the screens until I got to this one (image from online tutorial):
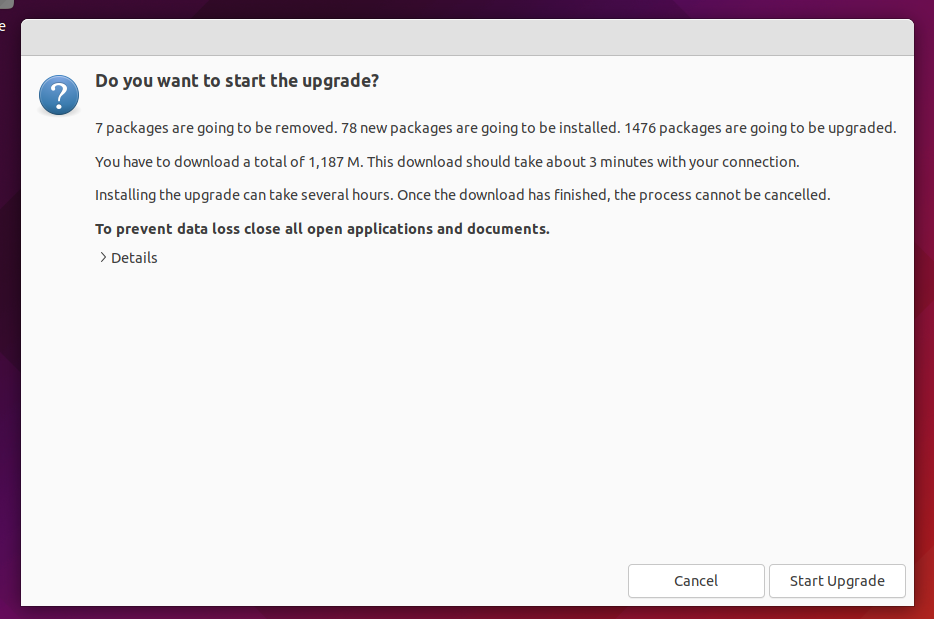
When I clicked on the “Details” tab a text box containing the details appeared and the window expanded to accommodate it. The problem was that the expansion happened vertically in both directions, something which resulted in the title bar, with its controls for resizing/minimizing/closing/moving the window, disappearing beyond the top edge of the screen and the “Cancel” and “Start Upgrade” buttons below disappearing beneath the bottom edge. Clicking on the Details tab again doesn’t help because it makes the text box disappear without returning the window to its original state.
This means that I’ve just lost all means of interacting with the window using the mouse, and if I opt to use the keyboard instead I’ll be working blind, with no way of verifying that the focus generated by the tab key was on the correct button. My setup is a VirtualBox virtual machine with the screen scaled to 100%, a typical platform with a typical configuration. A UI design failure of this type is unacceptable under any circumstances, but what makes this particular one egregious is that it occurs in a crucial application like the OS upgrade client, where pressing the wrong button can completely ruin your day.
The only good thing about the situation is that it happened at an early stage in the process, where cancellation was still a viable option. I pressed the tab key once, thereby (hopefully) setting the focus on “Cancel”, and pressed “Enter”, which resulted in the cancellation of the upgrade process.
I sighed, put my techie hat back on, and returned to the good old command line.
The command line upgrade process is simple and painless. But regardless of the upgrade method used, there will always be broken packages afterwards that have to be discovered and fixed. This time I discovered that the upgrade had broken crucial packages all along my web stack, namely Apache, MySQL, and phpMyAdmin. Moreover, I discovered that Emacs had been completely removed from the system.
I won’t go into the details of how I spent the couple of hours after the upgrade, but here’s a summary:
- Apache broke because when Ubuntu upgraded PHP from 7.4 to 8.1 Apache’s configuration files weren’t updated to point to the new version of PHP.
- phpMyAdmin and Emacs were both removed. I’m not sure why but it could have something to do with each of them having been originally installed as part of a bundle (LAMP in the case of phpMyAdmin and Git in the case of Emacs) instead of through the standard installation process. If this hypothesis is correct then reinstalling the packages individually should resolve the issue.
- MySQL is a package that breaks on every upgrade and I have to admit that I bear part of the responsibility for that. Shortly after installing it for the first time I did a lot of half-ignorant mucking about with the configuration files to get it to work, and it became a tradition for every OS upgrade afterwards to trip over one of the changes I made at the time. Fortunately, the changes are easy to spot and revert with the aid of the error messages.
Based on this year’s experience, here are a few ways I can see of improving the upgrade process:
A few days ago a software update on Ubuntu broke the left-click functionality on my touch pad. This is how it happened and how I fixed it.
It all started in the morning when I ran sudo apt update, and upon discovering that there were no less than 48 packages waiting to be upgraded I ran sudo apt upgrade. I didn’t pay much attention during the upgrade process but, as you’ll see later, that wouldn’t have made a difference. This is a virtual machine that I mostly use for development work, but all I did afterwards was browse a couple of websites and then shut it down.
Later, whilst sipping my coffee, I powered up the machine to get some work done. However, when the log in screen appeared I discovered that clicking on the account section didn’t make the password field appear. I then tried clicking on the menu bar options at the top, but nothing happened. Moving the cursor over the GUI elements activates hover effects and reveals tool tips, but clicking was useless. I let out a sigh, rolled up my metaphorical sleeves, and set to work.
I began the troubleshooting process, conventionally enough, by performing a reboot. I had access neither to the Power Off option in the menu nor to the command line, so I performed a shutdown using VirtualBox’s ACPI Shutdown feature (EDIT: It slipped my mind at the time that you can access the terminal before logging in and log in or perform a shut down from there). When I powered on the machine again I discovered that the problem hasn’t been solved. But this time, unlike before, it occurred to me to click on the “Not listed?” link, and to my surprise the username prompt appeared. I promptly entered my username and password and logged in.
I clicked around the desktop, but the only additional piece of information I gained was that the right-click functioned normally, showing context menus wherever it should. I concluded that, with the odd exception of the “Not listed?” link mentioned before, nothing in the GUI responds to left-clicks.
The obvious next step was to fire up the terminal, something which, of course, had to be done using the keyboard. I was practically certain that one or more of this morning’s updated packages was responsible for the current state of affairs, so I began my investigation by running sudo apt update, thinking that if a package hadn’t been installed properly it might be listed as available. But the result was negative: no updates were available.
The next step was to dig deeper and examine the package manager’s log file. A bit of googling (on my phone of course) informed me that the file was at /var/log/dpkg.log. I used the grep command to retrieve a list of installed packages from the log file and filter them by date, and redirected the output to a new file. Examining the file showed that of the 48 packages installed this morning, 42 failed to install properly (i.e. had records listing “half-installed” as status). The records also showed that many of the “half-installed” packages were successfully reinstalled afterwards (i.e. each one had an additional record listing “installed” as status), so the next step was to ascertain which, if any, of the packages had a “half-installed” record without having a corresponding “installed” record.
I used grep twice again on the log file, sending each group of “installed” and “half-installed” records to a separate file. And to make the upcoming comparison job easier I used the sort command to sort each file’s contents by package name. I then opened each file in a separate tab and began checking the “half-installed” records against the “installed” records. But the result was again negative: every single package with a “half-installed” record had a corresponding “installed” record.
By now the package manager has twice assured me that the morning’s packages were properly updated. But I wasn’t buying it. It was time to closely examine the purpose of each one of the 42 reinstalled packages. I noticed that of the 7 packages directly related to the system’s GUI, 5 were specifically related to the display server. Four of the updates were to Xserver’s packages while the fifth was to the XWayland package. I don’t know much about display servers but I knew that GUI applications rely on them to function properly. I also knew that Ubuntu was transitioning from Xserver to Wayland, and a bit of googling informed me that XWayland is a compatibility layer used to run Xserver applications on Wayland. Now, for all I knew, any of these 5 packages could have caused the issue, but since my past experience with Wine had left me biased against compatibility software I decided to start with the XWayland package. Sure enough, as soon as I reinstalled the package, the left-click functionality returned.
While dealing with this incident I learned some interesting bits of technical information. But as far as the larger picture was concerned it only confirmed what I already knew:
- Never trust the package manager.
- The command line is awesome.
- “Year of Linux on the Desktop” my ass.
Posted: 29-07-2022
Tags: linux
